|
Fitzski's Hexagonal Picnic Table
April 2005
|
We built our deck in 2003, finally got it all stained in 2004, and wanted to enjoy 2005 sitting at a new picnic table.
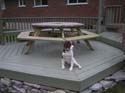
The deck has 3 levels, the lowest of which is a 16' (point to point) hexagon, with a bench and railing built into the 2 back side angles.
There is also a trellis, and we always planned on building a picnic table to fit this space.
After some quick measurements to see what the maximum table size could be while still allowing room to walk around (about 2' between the table and the built in bench), 9' point to point seemed pretty good.
With that rough size, I drew some quick and dirty sketches, enough to figure out what lumber I would need.
I planned on recycling what I could out of a standard cedar picnic table we had, and doing the rest out of pressure treated (PT) (since it would get a solid stain when complete anyway).
I used 2x6s for the top (all from the old table) and the benches (one side from the old table, otherwise PT), and 2x4 PT for the upper and lower frames and legs.
I had some 1/2" and 3/4" plywood as the support for the upper and lower frames.
 I did all construction in the basement, as the flat surface really facilitates getting the measurements right for the angles, plus easy access to the miter saw on its long worktable.
Job 1 was the joists for the upper frame.
I cut all 6 pieces to the same length (3'), leaving plenty of extension.
With those cut, I laid them out and measured the hexagon.
Since a hexagon is simply 6 equilateral triangles, measurement is relatively easy - just make sure the ends of each joist are the same distance apart as they are long (3').
Once the joists were laid out, I secured them temporarily with a thin sheet of plywood to keep them from wandering while I attached the surface boards.
I did all construction in the basement, as the flat surface really facilitates getting the measurements right for the angles, plus easy access to the miter saw on its long worktable.
Job 1 was the joists for the upper frame.
I cut all 6 pieces to the same length (3'), leaving plenty of extension.
With those cut, I laid them out and measured the hexagon.
Since a hexagon is simply 6 equilateral triangles, measurement is relatively easy - just make sure the ends of each joist are the same distance apart as they are long (3').
Once the joists were laid out, I secured them temporarily with a thin sheet of plywood to keep them from wandering while I attached the surface boards.
Laying the surface boards is a bit time consuming, but pretty straightforward.
Again, being a hexagon, every cut needs to be 30 degrees.
However, a good trick to speed things up is to lay the first triangle's surface boards with the ends extending over the joists, then snap a line along the centre of the joist and trim the surface boards with a circular saw set to the depth of the surface board.
The next 4 triangles require that you pre-cut one side to fit, then let the unfinished side overhang and trim later.
The final triangle, obviously, requires both sides to be pre-cut, but a miter saw makes this an absurdly easy job.
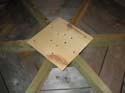
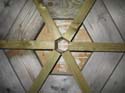
The upper frame was then secured on the underside with a hexagonal piece of 1/2" plywood, 12" across, with 3-2.5" screws into each joist.
The table top is, effectively, 10-2x6s wide (each triangle is 5 2x6s deep), and is attached with 2.5" wood screws.
The lower frame is essentially the same, just larger.
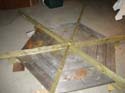
 I cheated a bit when laying the joists for the lower frame - I just put them on top of the upper frame, lined them up, and secured with a temporary piece of plywood.
Things looked pretty accurate, so I had no complaints!
(I could have angled everything to fit tightly in the centre, but felt it an unnecessary hassle, plus I wanted to leave the centre hole in case we ever wanted to add an umbrella.)
The lower frame was then secured on both sides with a hexagonal piece of 3/4" plywood, 14" across, with 3-2.5" screws into each joist on each side - plenty solid!
The bench seats were 2-2x6s wide, attached with 2.5" wood screws.
I cheated a bit when laying the joists for the lower frame - I just put them on top of the upper frame, lined them up, and secured with a temporary piece of plywood.
Things looked pretty accurate, so I had no complaints!
(I could have angled everything to fit tightly in the centre, but felt it an unnecessary hassle, plus I wanted to leave the centre hole in case we ever wanted to add an umbrella.)
The lower frame was then secured on both sides with a hexagonal piece of 3/4" plywood, 14" across, with 3-2.5" screws into each joist on each side - plenty solid!
The bench seats were 2-2x6s wide, attached with 2.5" wood screws.
 Now the tricky part: determining how much horizontal "gap" to leave between the outside edge of the table surface, and the inside edge of the bench.
Too little, and it would be awkward to get in and out gracefully.
Too much, and you would be sitting impossibly far away from your food.
Similarly, I had to negotiate the height of the bench, and the overall height of the table (meaning, the vertical gap between the bench and the surface).
The easiest way was to set it up and play around with shims until it seemed comfortable.
It ended up being 17.5" from floor to bench top, and another 12.5" from bench top to table top.
At this point I was also able to cut and measure the legs.
Now the tricky part: determining how much horizontal "gap" to leave between the outside edge of the table surface, and the inside edge of the bench.
Too little, and it would be awkward to get in and out gracefully.
Too much, and you would be sitting impossibly far away from your food.
Similarly, I had to negotiate the height of the bench, and the overall height of the table (meaning, the vertical gap between the bench and the surface).
The easiest way was to set it up and play around with shims until it seemed comfortable.
It ended up being 17.5" from floor to bench top, and another 12.5" from bench top to table top.
At this point I was also able to cut and measure the legs.
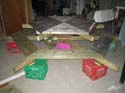
After wrestling the upper and lower frames outside, I assembled the table upside down on the deck, laying the bench frame on the upper frame.
I attached the legs at a uniform spot on each joist of the upper frame with 1/2"x3" carriage bolts.
Then, I propped up the lower frame, eyeballed everything, and used a quick jig (a level with a block of wood held by a clamp) to make sure the legs were all attached at a uniform distance from the bench bottom.
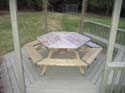
After tightening everything up, we flipped it over, and oh my! It's flat!!
To finish, I trimmed the excess from the joists, then chopped the sharp bit off each point of the bench and top, and put 45 degree angles on the joists to save elbows, knees and shins.
Once the wood has had enough time to dry thoroughly, it will be sanded, have the edges routed, and be stained.
It weighs a ton, and will easily sit 6 with LOTS of room. People could sit at each corner and be comfortable as well, for a theoretical maximum of 12.